Cautions for electrical technicians using medical electrics
Forbidden operation
Warning:
● There is strong magnetic components on this vehicle
● If technician use medical electrics,e.g electronic pacemakers, which couldn’t be operated in the vehicle ,otherwise,the function of electrics may be effected by strong magnetic components.
Cautions for normal charge
Warning:
● If technician use the medical electrics like pacemakers, cardiovascular, in addition to the top, the machine only could be used after the function of machine checked and confirmed before normally operation.
● In the normal charging operation, Medical electrics may be affected by electromagnetic wave. When Technicians use the medical electrics like pacemakers, cardiovascular, in addition to the top etc, it is not allowed to enter into crew capsule (including luggage).
Cautions for communication equipment
● If technicians use the medical electrics like pacemakers, cardiovascular, in addition to the top etc, please keep enough distance with the communication equipment.
● Remote intelligent terminal of electromagnetic waves may affect the function of the medical electrics like pacemakers, cardiovascular, in addition to the top etc.
● If technicians use the medical electrics like pacemakers, cardiovascular, in addition to the top etc, remote intelligent terminal of electromagnetic waves may affect the function of the medical electrics. It is needed to let the manufacturer of the medial electrics confirm that the possible affection to medical electric equipment when using remote intelligent terminal .
Keypoint checking before maintenance
High pressure system can be run automatically, it is need to confirm that remote air conditioning and recharged regularly are not set before maintenance.
Cautions:
● If set remote air-conditioner or charged regularly, even though the switch is closed, high pressure system can be run automatically.
Cautions for "safety airbag"and"safety belt preloaded"of auxiliary constraint system
The combination use of "safety airbag"and"safety belt preloaded"of auxiliary constraint system and front seat belt could decrease the damage to driver and passengers when collision. The auxiliary constraint system include seat belt, airbag for driver, airbag for co-driver. The detailed information for auxiliary constraint system could refers to the sections of “airbag system” and “seat belt”
Warning:
To avoid unexpected accident, we need to obey the following:
● To avoid the auxiliary constraint system invalid, all the maintenance only could be operated by JAC authorized distributors because the risk of injury to people will be increased after invalid.
● Non-standard auxiliary constraint system of maintenance including non-standard disassembly and installation, may result in auxiliary constraint system accident triggered, causing personal injury accidents. About remove the airbag module method, please see "airbag system" section.
● In addition to the maintenance instructions in the manual operation, do not use electrical test equipment to test any circuit of auxiliary constraint system. Auxiliary constraint system of connectors and wiring harness use yellow or orange color.
Cautions when use electrical tools (pneumatic or electric)and hammer
● when electric switch in the "ON" block, near the airbag diagnostic sensors or other sensor, do not use power tools or hammer to operate sensor parts area. Severe vibration may activate the sensor, some airbags, causing serious damage.
● When using power tools or hammer, put the keys in the "LOCK" block, unplug the 12 v lead-acid battery cathode, waiting at least 1 minute, then for checking and maintenance.
Cautions for removing 12V battery
Turn the key to “on”,then to “lock” before remove 12v battery
Tip:
● Even if the key in the "LOCK" and the 12 v battery charging function may start automatically.
● After turn the key to "ON" --> "LOCK", 12 v battery automatic charging will not start.
Tips and cautions for wheel service and maintenance
● The original JAC wheel is specially designed for each type vehicle, is only used for specified type.
● Please use authentic JAC parts,wheels, valve cap and tire nut.
● Please use after wheel balance adjustment. Please adjust wheel balance with JAC original balance block.
● When do maintenance, please avoid scratch the surface coating. When clean the dirt on wheels, please use soft brush, it is prohibited to use any abrasives, steel wire brush, or other tools may damage the coating. Please use neutral detergent if necessary.
● Please rinse thoroughly the wheels after driving in n the release of deicing salt (deicing salt) road.
● When equipped wheel assembly onto the vehicle, please clean up the foreign bodies on the surface of the installed wheels in case of wheel deformation.
● Please do not apply oil on the tire nut and screw.
● Please use the hand to tighten the valve cap, banning the use of tools.
Commonly used tools
The factual tool shape may be different with the diagram showing.
|
Tool |
Diagram |
Instruction |
|
Power tool |
|
Install and remove bolts and nuts |
Working process
1 Collect customer information
Before check carefully ask customer concerns or driving vehicles together with the customer which is very important to solve the problem.
2 Basic check
① key is on the shift of “LOCK”.
② Check all the tire pressure and adjust it to the specified value. Please see the “wheel - maintenance data and specification”.
③ Check the tread. Please see the “wheel - regular maintenance”.
④ Check wheel.Please see the “wheel - regular maintenance”.
If there is any fault or cannot continue to use the spare parts, please repair or replace.
3 Road test check
① Start vehicle.
② Driving vehicles for 10 minutes with more than 40 km/h speed, then stop.
4 Confirm the symptoms disappear
If symptoms disappear, that is, complete maintenance. If did not disappear, need to do basic check and road test again.
Troubleshooting for noise,vibration and unsmooth(NVH)
NVH troubleshooting diagram
Using the table below helps to find the causes of symptoms. If necessary, repair or replace these parts.
|
Referring content |
Wheel -explosion diagram |
Wheel-test |
Wheel-wheel balance check |
Wheel- tire pressure |
Wheel-tread check |
- |
- |
Wheel maintenance and specificaion |
Front axle-driving shaft assembly |
Reducer NVH |
Front axle and suspension NVH |
Rear axle and front suspension NVH |
- |
- |
Braking system NVH |
Steering system NVH |
||
|
Possible reason and parts |
Improper install, loose |
Not round |
Not balance |
Tire pressure abnormal |
Abnormal wearing. |
Deformation ofr wearing |
inconsistency |
Wrong tire data |
Driving shaft |
Reducer |
Front axle and front suspension |
Rear axle and rear suspension |
Tire |
Wheel |
brake |
Steering assembly |
||
|
symptom |
Tire |
Noise |
√ |
√ |
√ |
√ |
√ |
√ |
√ |
|
√ |
√ |
√ |
√ |
|
√ |
√ |
√ |
|
Shaking |
√ |
√ |
√ |
√ |
√ |
√ |
√ |
√ |
√ |
|
√ |
√ |
|
√ |
√ |
√ |
||
|
Jumping |
√ |
√ |
√ |
√ |
√ |
√ |
√ |
√ |
|
|
√ |
√ |
|
√ |
√ |
√ |
||
|
Uncomfortable or difficult to operate |
√ |
√ |
√ |
√ |
√ |
√ |
|
√ |
|
|
√ |
|
√ |
√ |
|
|
||
|
Wheel |
Noise |
√ |
√ |
√ |
|
|
√ |
|
|
√ |
√ |
√ |
√ |
√ |
|
√ |
√ |
|
|
Shaking |
√ |
√ |
√ |
|
|
√ |
|
|
√ |
|
√ |
√ |
√ |
|
√ |
√ |
||
|
Jumping |
√ |
√ |
√ |
|
|
√ |
|
|
|
|
√ |
√ |
√ |
|
√ |
√ |
||
|
Uncomfortable or difficult to operate |
√ |
√ |
√ |
|
|
√ |
|
|
|
|
√ |
√ |
√ |
|
|
|
||
√:fittable
Check
Check the wheel whether there is bending, damage, crack, abnormal wearing and tearing or other damage. If yes, please replace.
Wheel assembly balance adjustment
Remove
1 Remove wheel assembly needed to be adjusted.
2 Remove the old balance blocks on both sides of the wheels, and clear the foreign body on the tire tread pattern.
Tips:
If it is the new tires ,should remove tape on the tires .
Caution:
When remove , avoid to scratch the wheel.
Wheel assembly balance adjustment
1 Equip wheel assembly in the wheel balance machine through the central hole, then starting wheel balance machine.
2 When the wheel balancing machine shown on the display unbalance value on either side of the inside and outside, to the lateral unbalanced value multiplied by 5/3 that is the need to use the balance of block theoretical quality.Then choose the closest balance blocks installed on the specified location.
Caution:
● Before installing the balance block, please clean the mating surface .
|
a. When equipping the wheel balance block on the wheel, as shown in the picture on the right, should be put in the slotted area with inner wall of the wheel, make the center of the balance location of the quasi wheel balancing machine instructions (or Angle). |
|
|
Caution: ● Balance block cannot repeatedly be used ● it shall be installed not more than three balance blocks in a single wheel lateral. ● Always use original balance block. |
|
|
b. If the calculated balance blocks quantity is more than 50 g, install two pieces balance block on a straight line. |
|
Caution:
● It is forbidden to put balance block on another piece of balance block.
3 Restart wheel balance machine.
4 According to the position of the wheel balancing machine instructions (or Angle), hit balance block into the inner side of the wheel.
Caution:
● Shall install the lateral balance blocks, and then install the inside of the balance block.
● The balance block installed in a single wheel inside shall be no more than two pieces.
5 Start balancing machine. Confirm the rest of the inside and outside the imbalance value is ≤5g. If either side of the residual unbalance value is more than 5 g, please re-install the balance block.
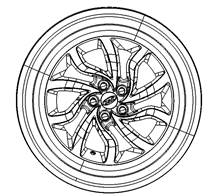
Wheel assembly transposition
|
The recommended transposition wheel assembly as shown in figure. Arrows point to the vehicle direction.
|
|
Caution:
● Please transposition according to the regulation of the vehicle warranty maintenance manual .
● When install the wheel assembly, please tighten tire nut according to the regulated torque , prohibiting more than standard torque requirements. When tighten tyre nut, should be 2 to 3 times diagonal tightening in case of wheel deformation.
● Please use JAC original tire nut.
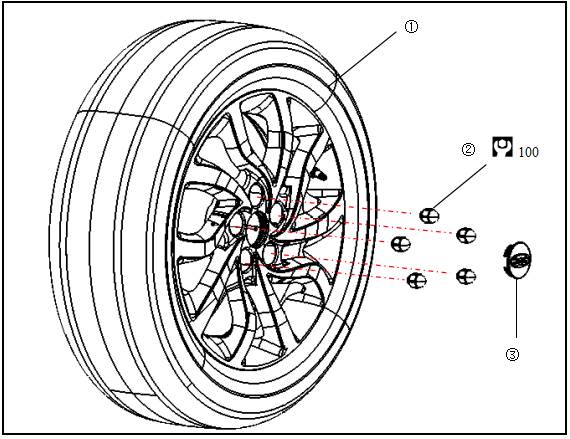
Explosion diagram
![]()
![]()
|
1 wheel assembly |
2 nut of tyre |
3 decorative cover assembly |
![]() :N·m
:N·m
Remove
|
1 Remove tire nut. ● Tightening torque:90~110N·m 2 Remove wheel assembly
|
|
1 Tire pressure check
Check tire pressure. If it is not in the standard range ,please adjust it.
Standard value:220±10kPa
Caution:
|
● Check the tire pressure with good performance of the tire pressure gauge . ● Tire pressure should check once a month under the cold condition, cold condition refers to the vehicle parking at least 3 hours or 3 hours after the mileage traveled is less than 1.6 km. ● When the environmental temperature changes often, should often check the tire pressure. ● Inaccurate tire pressure may be resulted in: |
|
Insufficient tire pressure may resulted in tire shoulder wearing, tire deflection, rolling resistance increase quickly.
b Air pressure is too high may result in central tire crown rapid wearing and tearing, and reduce the size of tire buffering capacity.
|
2 The tire surface inspection ① Check whether there is a foreign body in the tire tread pattern. If yes, please clean it. ② check the height of tire tread |
|
Caution:
● When the tire tread depth used to limit or less, tire tread pattern will show wearing marks.When wearing mark appear three places, please replace the tires.
3 replace tire
① Tire should be replaced after vehicles moving after 50000 km.
② If appear any of the following one, also need to replace:
● The tire show curtain or curtain line
● Tire bulge, uplift, or layered.
● Tires were pricked, cut, or other damage, beyond repair.
Caution:
● In new tire period should avoid nasty acceleration, sharp turn or nasty brake, avoid to use in the bad road conditions, prevent new tires damaged too early.
● Tyre specification 205/55 R16 94V
● Please do tire assembly balance adjustment after change tire .
4 Wheel check
|
● Check whether there is cracks or other damage in the wheel. If yes, please replace. ● Check whether the wheel has deformation. If yes, please measure the jumping amount. Remove the tire and install wheel in the wheel balance machine. As shown in figure set the dial gauge, measuring wheel hop. If more than standard, please replace. |
|
Install in the opposite order of remove
Maintenance data and specification
|
Item |
parameter |
||
|
Wheel jumping amount |
Radial |
Steel wheels (e.g., equipment) |
≤1.0mm |
|
Aluminum wheels |
≤0.3mm |
||
|
axial |
Steel wheels (e.g., equipment) |
≤1.0mm |
|
|
Aluminum wheels |
≤0.3mm |
||
|
Tire pressure( cold condition) |
|
||
|
Tire specification |
|
||